How to Create a Stunning Classic Christmas Tree That Feels Like Coming Home
Contents
- How to Create a Stunning Classic Christmas Tree That Feels Like Coming Home
- What Makes a Christmas Tree “Classic”?
- Planning Your Classic Tree: The Unglamorous Stuff That Actually Matters
- Choosing Your Tree
- Size Matters (Really)
- Budget Reality Check
- Setting Up Your Tree: The Foundation
- Step 1: Fluff Every Single Branch
- Step 2: Light It Up (Even If It’s Pre-Lit)
- Ornament Strategy: This Isn’t Random
- My Color Formula
Classic Christmas tree decorating is one of those things that looks effortless when done right but can feel overwhelming when you’re staring at boxes of ornaments with no game plan.
I’ve decorated more trees than I care to count, and I’ll be honest—my first attempts looked like a toddler threw tinsel at a pine tree and called it festive.
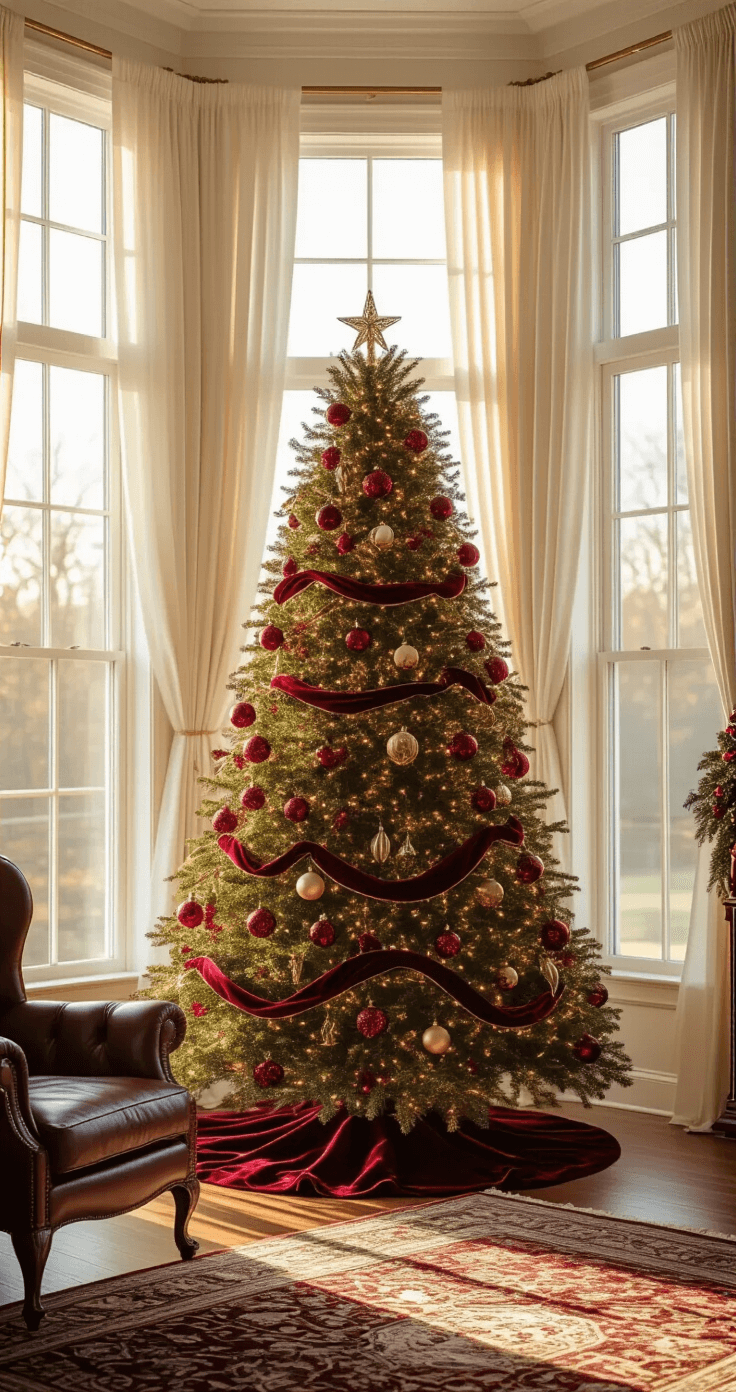
The beauty of a classic tree is its timeless appeal. While trends come and go (looking at you, all-white minimalist trees), the traditional red-and-green tree never falls out of style.
Let me walk you through exactly how I create that warm, nostalgic look every single year.
What Makes a Christmas Tree “Classic”?
A classic Christmas tree celebrates tradition.
Think of the trees you saw in your grandparents’ living room—full-bodied evergreens adorned with glass ornaments, warm twinkling lights, and that unmistakable combination of red, green, and gold.
The classic aesthetic includes:
- Deep, rich colors (forest green, crimson red, metallic gold)
- Traditional ornament shapes (balls, bells, stars, angels)
- Warm white or soft yellow lighting
- Natural materials mixed with glass and metal
- A sense of abundant fullness rather than sparse minimalism
This isn’t about being boring. It’s about creating a look that makes everyone who walks into your home feel like they’ve stepped into a Christmas card.
Planning Your Classic Tree: The Unglamorous Stuff That Actually Matters
Choosing Your Tree
I always recommend starting with a high-quality artificial tree if you’re building a classic look.
Natural trees are gorgeous, but they drop needles everywhere and limit how early you can decorate. For a truly classic appearance, look for trees with dense branching and realistic needle texture.
Key features to prioritize:
- Full, thick branches (not sparse or “see-through”)
- Hinged branch construction for easier setup
- Height appropriate for your ceiling (leave 12-18 inches clearance for your topper)
- Pre-lit options with warm white lights save massive amounts of time
A pre-lit artificial Christmas tree with warm white LEDs becomes your foundation.
Size Matters (Really)
I learned this the hard way.
My first “classic” tree was a scraggly 6-footer in a room with 12-foot ceilings. It looked ridiculous—like a shrub trying to impersonate a tree.
Room-to-tree proportions:
- 8-foot ceilings: 6-7 foot tree
- 9-foot ceilings: 7-8 foot tree
- 10+ foot ceilings: 9-10 foot tree (go big or go home)
Measure twice, buy once. Trust me on this.

Budget Reality Check
Here’s what I actually spend on a classic tree setup:
Initial investment (Year 1):
- Quality artificial tree: $200-400
- Light strands (if not pre-lit): $40-80
- Ornament collection starter set: $60-100
- Tree topper: $25-50
- Tree skirt: $30-60
- Ribbon: $20-40
Total: $375-730
Sounds like a lot, but this setup lasts 10+ years.
Annual additions: I add $30-50 worth of new ornaments each year to keep things fresh without starting from scratch.
Setting Up Your Tree: The Foundation
This is where most people rush and regret it.
I used to throw my tree together in 20 minutes and wonder why it looked flat. Now I dedicate a full afternoon, and the results are night-and-day different.
Step 1: Fluff Every Single Branch
I mean every single one.
When you pull an artificial tree from storage, the branches are compressed and pointing downward.
My fluffing technique:
- Start from the bottom and work up
- Separate each branch tip
- Angle branches slightly upward and outward
- Create depth by pulling some branches forward, pushing others back
- Stand back every few rows to check for gaps
This takes 45-60 minutes. Do not skip this. It’s the difference between a tree that looks obviously fake and one that photographs beautifully.
Step 2: Light It Up (Even If It’s Pre-Lit)
Pre-lit trees are convenient, but I still add extra Christmas tree lights for depth.
Lighting formula I follow: 100 lights per vertical foot of tree
For an 8-foot tree, that’s 800 lights minimum.
How I string lights:
- Start at the base near the trunk
- Weave lights deeper into branches, not just on the tips
- Circle the tree, moving upward
- Create an S-pattern on each branch section
- Plug in periodically to check for dark spots
The goal is ambient glow, not individual visible bulbs.
Warm white beats cool white every time for classic trees. Those harsh blue-white LEDs look modern and cold—totally wrong vibe.

Ornament Strategy: This Isn’t Random
Here’s where I see people go wrong.
They buy ornaments they like individually, then hang them randomly and wonder why the tree feels chaotic.
Classic trees need intentional color stories and deliberate placement.
My Color Formula
I stick to 4 colors maximum on any classic tree:
Primary colors (choose 2-3):
- Deep red
- Forest/emerald green
- Rich gold
- Creamy ivory/white
Accent color (choose 1):
- Burgundy
- Bronze
- Silver
- Champagne
This creates cohesion without being boring.
My go-to combination: red, gold, and cream with touches of green from the tree itself.
Ornament Types You Actually Need
This post may contain affiliate links. Please see my disclosure policy for details.