

Wooden Christmas Trees Changed My Holiday Decorating Forever
Contents
Wooden Christmas trees are transforming holiday décor from cluttered chaos into streamlined, sophisticated style.
I used to dread dragging our massive artificial tree from the garage every December—the tangled lights, the bent branches, the storage nightmare. Last year, I ditched that monster for something completely different, and I’m never going back.

Why Wooden Christmas Trees Actually Work
Look, I get it. You’re thinking these look cute in magazine photos but won’t deliver that “Christmas magic” feeling.
I thought the same thing until I built my first one.
The beauty of wooden Christmas trees isn’t just their Instagram-worthy aesthetic—though they photograph beautifully. These structures solve real problems that regular trees create.
Here’s what nobody tells you:
- No needle cleanup or watering schedules
- Zero storage drama (mine fits in a closet corner)
- Works in tiny apartments where full-size trees won’t fit
- Costs less than most pre-lit artificial trees
- You can customize every detail to match your existing décor
Plus, building one yourself takes maybe an afternoon, even if you’ve never touched a power tool.
The Real-World Benefits I Didn’t Expect
Space flexibility: My studio apartment couldn’t fit a traditional tree without blocking the window. A tabletop wooden Christmas tree sits perfectly on my console table.
Year-round potential: I keep mine up through February with different ornaments, then pack it away guilt-free knowing it took up maybe five minutes of storage space.
Pet-friendly design: My cat knocked over our old tree twice. This wooden version? She’s tried. Physics wins every time.

Building Your Wooden Christmas Tree: Start Here
The Basic Materials You Actually Need
Stop overthinking this. You don’t need a workshop or fancy equipment.
Essential supplies:
- Quality wood boards—cedar or pine work beautifully (1×6 or 1×8 boards from any hardware store)
- Wood glue for strong joints
- Sandpaper or electric sander (220-grit minimum)
- Saw (circular, miter, or even a hand saw if you’re patient)
- Clamps to hold pieces while glue dries
- Paint or stain depending on your vision
Optional but worth it:
- Battery-operated LED string lights
- Small decorative ornaments
- Wood plugs for covering screw holes
- Drill with basic bits
Two Styles That Actually Look Professional
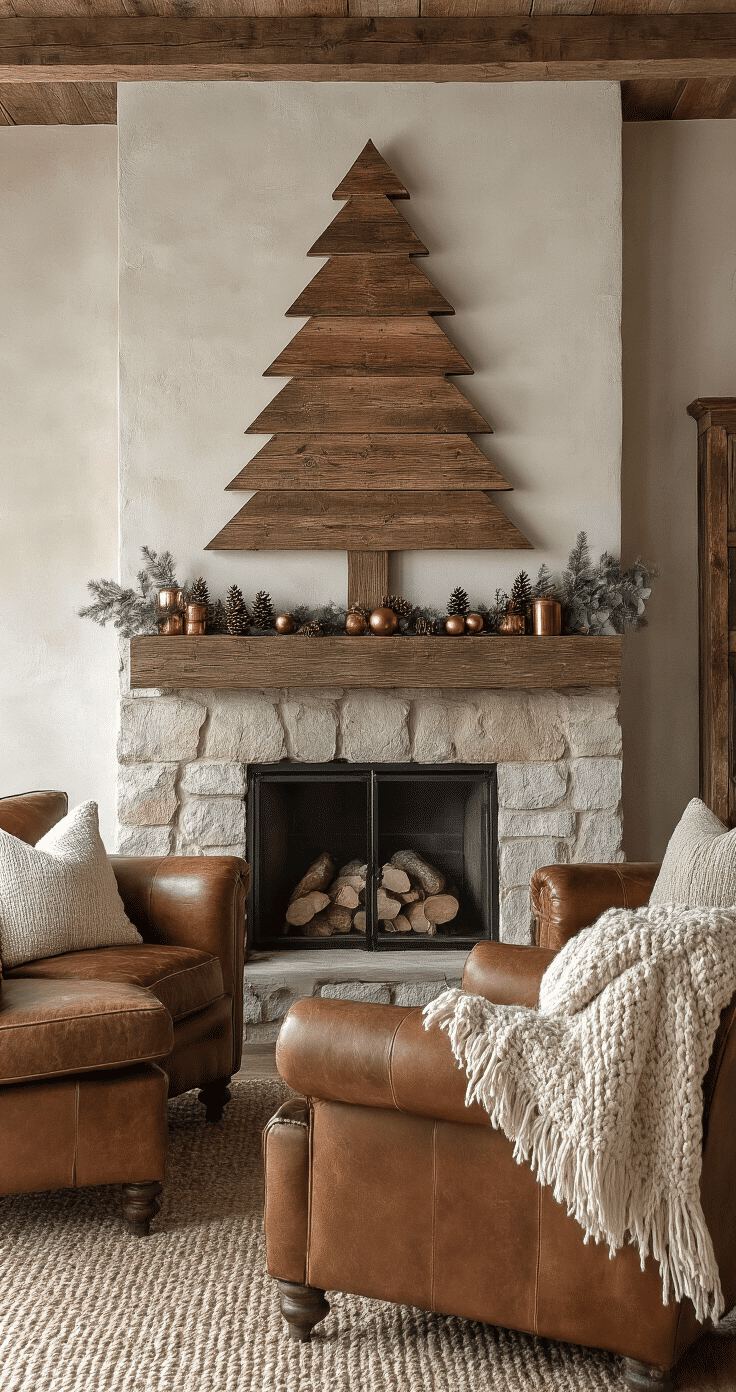
The Geometric Single-Piece Tree
This design uses angled cuts to create a triangular silhouette from a single board.
Cut your board into progressively smaller horizontal pieces—the bottom might be 24 inches, working down to a 4-inch top piece. Arrange them on a vertical center post or mount directly to your wall.
Simple. Clean. Modern.
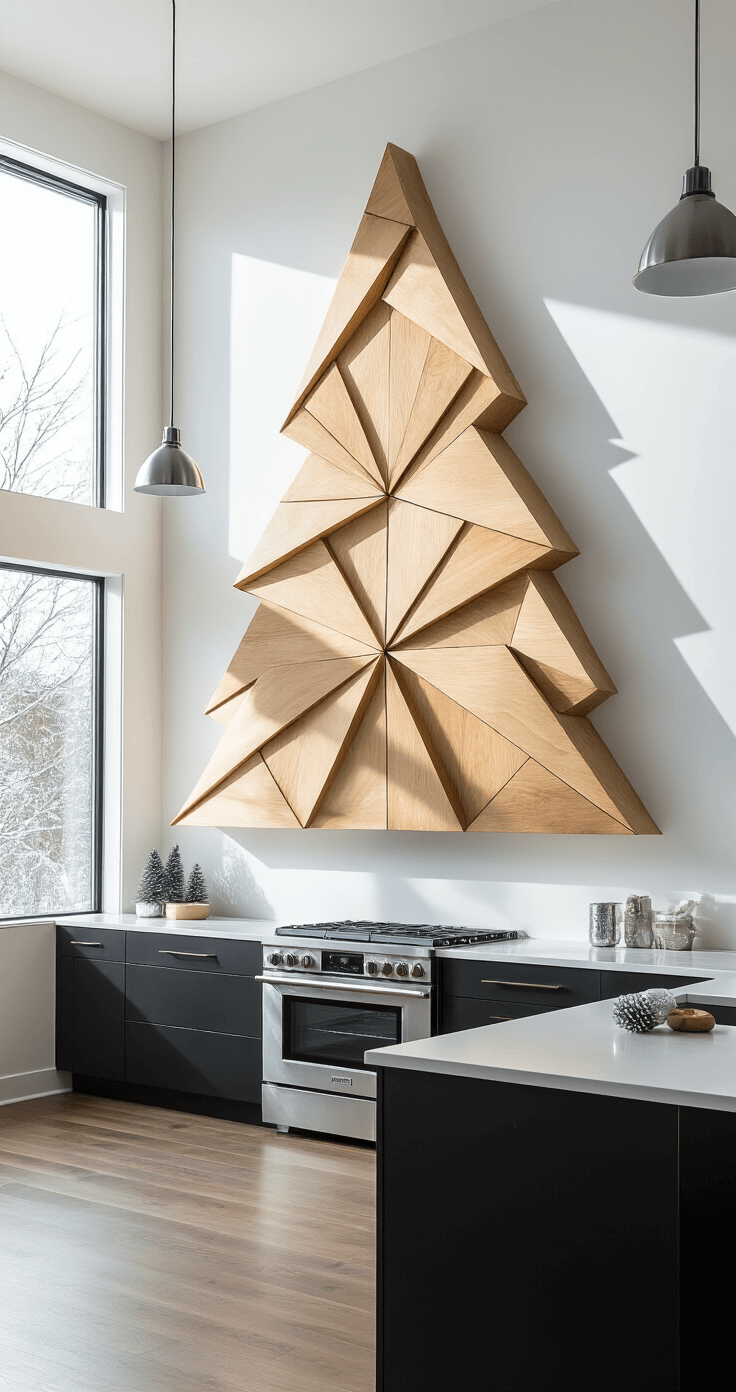
The Stackable Multi-Level Design
Think of this like building a wooden layer cake.
Each level consists of several boards arranged in a star or cross pattern, stacked on top of each other with spacers. The bottom layer might use 18-inch boards, middle layer 14-inch, top layer 10-inch.
This creates dimension and shadow play that photographs incredibly well.
My Step-By-Step Process (That Actually Works)
Phase One: Planning and Prep
Decide your size first.
Measure your display space before buying wood. I made this mistake—built a gorgeous 5-foot tree that wouldn’t fit anywhere in my apartment.
Common sizes that work everywhere:
- Tabletop: 18-24 inches tall
- Floor model: 3-4 feet tall
- Statement piece: 5-6 feet tall
Sketch your design.
You don’t need artistic talent. A rough drawing with measurements prevents expensive wood-cutting mistakes.
Phase Two: Cutting and Sanding
Cut your wood pieces to size.
If you don’t own a saw, most hardware stores will make cuts for you—sometimes free, sometimes for a few bucks. Worth every penny for clean, straight cuts.
Sand everything thoroughly.
This step separates amateur projects from professional-looking pieces.
Run your palm sander over every surface and edge. Go with the grain, not against it. Your hands should glide across the wood without catching splinters.
Trust me—rushing this step means painting over rough wood that feels cheap.
Phase Three: Assembly
Work from top to bottom for stackable designs.
Apply wood glue generously between contact points. Use clamps to hold pieces together while the glue sets—usually 30 minutes.
For single-piece designs, mount to a backing board first.
This creates stability and gives you something to prop against the wall.
Pre-drill holes before inserting screws.
This prevents wood from splitting, especially near edges. Hide screw heads with wood plugs for a seamless finish.
Phase Four: Finishing
Paint or stain? Here’s how I decide:
Paint covers imperfections and creates bold visual impact. Stain showcases natural wood grain and feels more organic.
I prefer paint for modern spaces and stain for farmhouse or Scandinavian aesthetics.
Apply 2-3 thin coats instead of one thick coat.
Thin layers dry faster and prevent drips. Sand lightly between coats with fine-grit sandpaper for professional smoothness.
Popular color choices that always work:
- Classic white for Scandinavian minimalism
- Deep forest green for traditional vibes
- Natural wood stain for organic warmth
- Charcoal gray for contemporary edge
- Two-tone (natural base with white or green tips)
This post may contain affiliate links. Please see my disclosure policy for details.


