

Spring Wreaths: Your Complete Guide to Creating a Stunning Front Door Welcome
Spring wreaths transform your home’s first impression faster than any other décor piece.
I remember the first spring wreath I ever made.
It was a disaster.
Hot glue burns on three fingers, flowers falling off within days, and a lopsided mess that made my front door look like it survived a craft store explosion.
But here’s what I learned: spring wreath-making isn’t about perfection—it’s about understanding a few core principles that separate droopy disasters from magazine-worthy masterpieces.
Why Your Spring Wreath Probably Looks… Off
You’ve seen those Instagram-perfect wreaths with cascading florals and perfectly balanced colors.
Then you look at yours.
Something’s wrong, but you can’t pinpoint it.
The flowers seem random. The colors clash instead of complement. The whole thing feels cluttered or strangely empty.
I’ve been there, staring at a wreath that cost $60 in materials but looks like a $5 clearance find.
The problem isn’t your creativity—it’s that nobody explains the actual structure behind beautiful wreaths.
The Foundation: Choosing Your Wreath Base Matters More Than You Think
Your wreath base is like the foundation of a house.
Get it wrong, and everything built on top suffers.
Popular base options:
- Grapevine wreath bases: Natural texture, sturdy, perfect for rustic or farmhouse styles
- Rattan forms: Lightweight, smooth, ideal for modern minimalist looks
- Boxwood bases: Pre-covered with greenery, gives you a head start
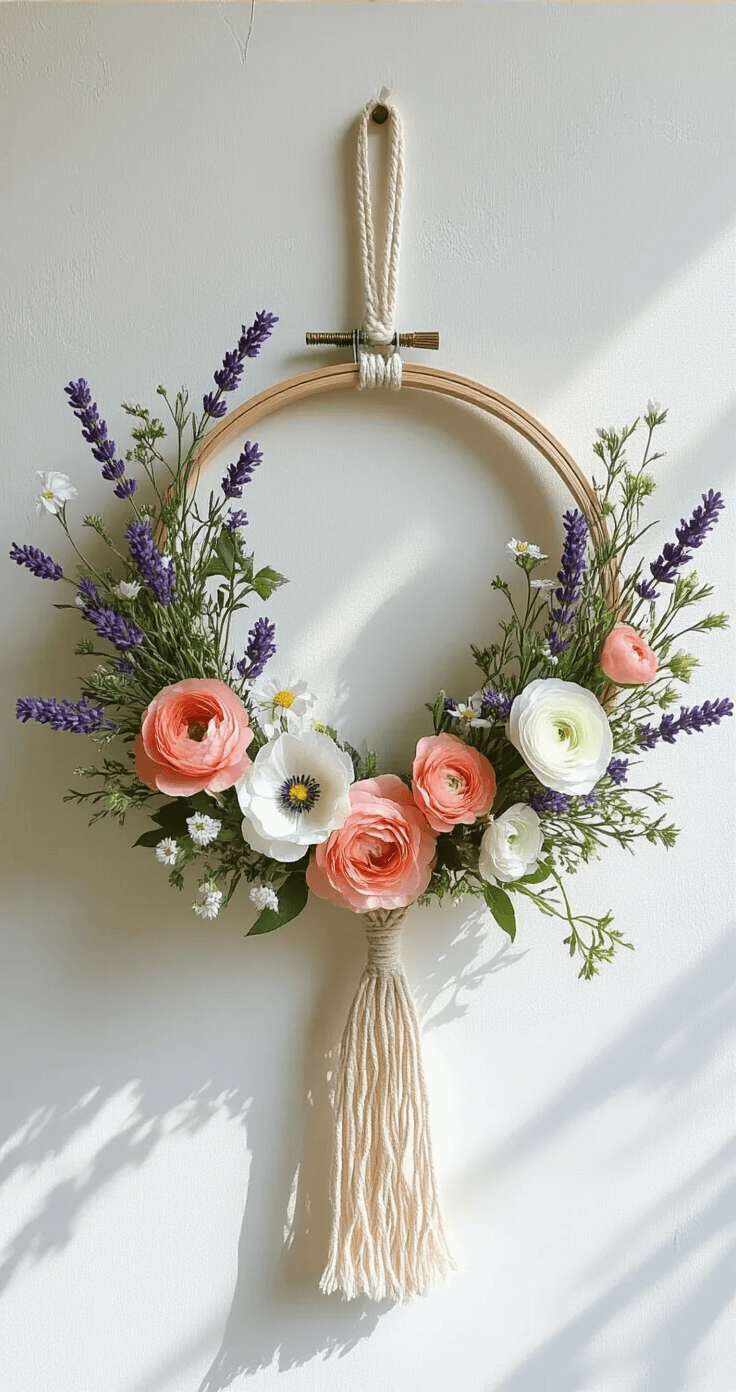
- Embroidery hoops: Unconventional but stunning for bohemian styles
- Wire wreath frames: Maximum flexibility for custom shapes
I always choose grapevine for spring wreaths.
The texture adds visual interest without extra work, and the natural brown complements every spring color palette.
Size matters too:
- 14-16 inches: Interior walls, small doors
- 18-20 inches: Standard front doors
- 22-24 inches: Large double doors, statement pieces
Don’t go bigger than your door can handle—oversized wreaths look cartoonish, not impressive.
The Color Psychology of Spring Wreaths That Actually Work
Here’s what design schools charge thousands to teach: color creates emotion before your brain consciously registers it.
Spring wreaths work because they tap into psychological associations with renewal and growth.
The 60-30-10 rule saves every wreath:
- 60% greenery and neutrals: Your foundation that grounds everything
- 30% primary florals: Your statement colors (soft pink, lavender, butter yellow)
- 10% accent pops: Unexpected elements that make people stop and look
I broke this rule on my second wreath attempt.
Used equal parts of five different colors.
It looked like a floral shop vomited on my door.
Color combinations that never fail:
- Soft pink roses + white peonies + eucalyptus green
- Lavender + cream + sage green
- Butter yellow + soft peach + natural wood tones
- Coral + blush pink + dusty green
Pick one combination and stick to it religiously.

Materials Shopping: What You Actually Need (And What’s Marketing Hype)
Walk into a craft store for wreath supplies and you’ll face 47 types of floral wire alone.
Overwhelming doesn’t begin to cover it.
Essential materials (don’t skip these):
- Floral wire (22-24 gauge for flowers, 18 gauge for heavy items)
- Hot glue gun with extra glue sticks
- Wire cutters (kitchen scissors won’t cut it—literally)
- Faux flowers in your chosen color palette
- Greenery stems (eucalyptus, ruscus, or Italian greenery)
Nice-to-have materials:
- Dried orange slices (add unexpected texture)
- Cotton stems (trendy but not timeless)
- Burlap ribbon (use sparingly—it dates quickly)
- Raffia for hanging (natural alternative to wire)
Skip these marketing traps:
- Pre-made floral picks (overpriced and limit creativity)
- “Wreath kits” (generic and obvious)
- Glitter anything (looks cheap in natural light)
I learned the hard way that spending $80 on premium silk flowers beats buying $30 of craft store basics.
Quality shows immediately.
Cheap flowers have that plasticky sheen that screams “fake” from across the street.
The Assembly Process Nobody Actually Explains Properly
Most tutorials skip the crucial details that separate amateur from professional results.
Let me walk you through what actually happens in my workspace.
Step 1: Create your greenery base layer
Start with your greenery stems.
Don’t glue yet—just position.
The directional flow technique:
Arrange all greenery stems flowing in the same direction (I prefer clockwise from the top).
This creates visual movement instead of static chaos.
Overlap stems by 2-3 inches.
Secure with floral wire wrapped around the base, not hot glue.
Why?
You’ll want to reuse this base next spring, and glue makes everything permanent.
Step 2: Establish your focal point
Every stunning wreath has one dominant area—usually at the bottom third or lower left quadrant.
This isn’t random.
The human eye naturally lands at the lower third when viewing vertical displays.
Place your largest, most beautiful flowers here.
For me, that’s typically three large roses or two oversized peonies.
Trim stems to about 2 inches.
Insert into the grapevine base at a 45-degree angle.
Secure with a dab of
This post may contain affiliate links. Please see my disclosure policy for details.


