

Deco Mesh Wreaths: Overcoming the Initial Challenges
Contents
Deco mesh wreaths nearly defeated me the first time I tried making one, and I ended up with something that looked like a craft store exploded in my living room.
But here’s the thing—I refused to give up on those fluffy, gorgeous door decorations I kept seeing everywhere.
After destroying three wreath forms and wasting enough mesh to wrap a small car, I finally cracked the code.
Now I’m going to save you from the same frustration I went through.
Why Your First Wreath Might Look Like Garbage (And That’s Okay)
Let me be brutally honest with you.
Your first attempt probably won’t be Instagram-worthy.
Mine looked like a sad poodle that got caught in a tornado.
The mesh was lumpy in some places, completely flat in others, and the whole thing drooped like it was depressed.
But that’s exactly how we learn.
I’ve now made dozens of these wreaths, and each one taught me something new about what works and what absolutely doesn’t.
The biggest lesson? There’s a system to this chaos, and once you understand it, you’ll be cranking out beautiful wreaths faster than you can say “craft fair side hustle.”

Everything You Need Before You Start (Don’t Skip This Part)
I learned the hard way that running to the store mid-project because you forgot pipe cleaners is the fastest way to lose your crafting momentum.
Here’s your shopping list:
Essential supplies:
- 14-inch wire wreath form (the three-ring kind—don’t get fancy with other shapes yet)
- Deco mesh rolls in at least two colors that actually look good together
- Four rolls of 2.5-inch ribbon (about 3 yards each)
- Pipe cleaners (grab a big pack—you’ll use more than you think)
- Sharp scissors that can actually cut mesh without shredding it
Optional but highly recommended:
- Cardboard pieces (10×10 inches and 12×6 inches) for templates
- Wire cutters for trimming pipe cleaners
- Decorative embellishments like wooden letters, signs, or seasonal picks
The color combination matters more than you’d think.
I once paired orange and purple mesh thinking it would look “fun and festive” and ended up with something that belonged in a Halloween clearance bin in January.
Setting Up Your Wreath Form (The Foundation Nobody Talks About)
This is where most people mess up, and nobody warns you about it.
You need to attach pipe cleaners to your wreath form BEFORE you start adding mesh.
Here’s how I do it now:
Attach one pipe cleaner every 3-4 inches around both the inner ring and outer ring of your wreath form.
Just twist them on loosely—you’ll tighten them later with all your decorative elements inside.
I space mine about the width of my four fingers apart, which keeps things consistent without requiring a measuring tape.
Count how many pipe cleaners you used because you’ll need to know this number later.
My 14-inch forms usually take about 30-35 pipe cleaners total when I space them properly.
Pro tip I wish someone had told me: Attach your pipe cleaners all pointing the same direction (I do clockwise) so when you’re working around the wreath, you’re always twisting the same way.
This tiny detail will save your sanity.

Creating the Base Layer with Filler Mesh
This step covers up that ugly wire form and creates the fluffy foundation everything else sits on.
Start with your lighter or more neutral colored mesh for this part.
Here’s my exact process:
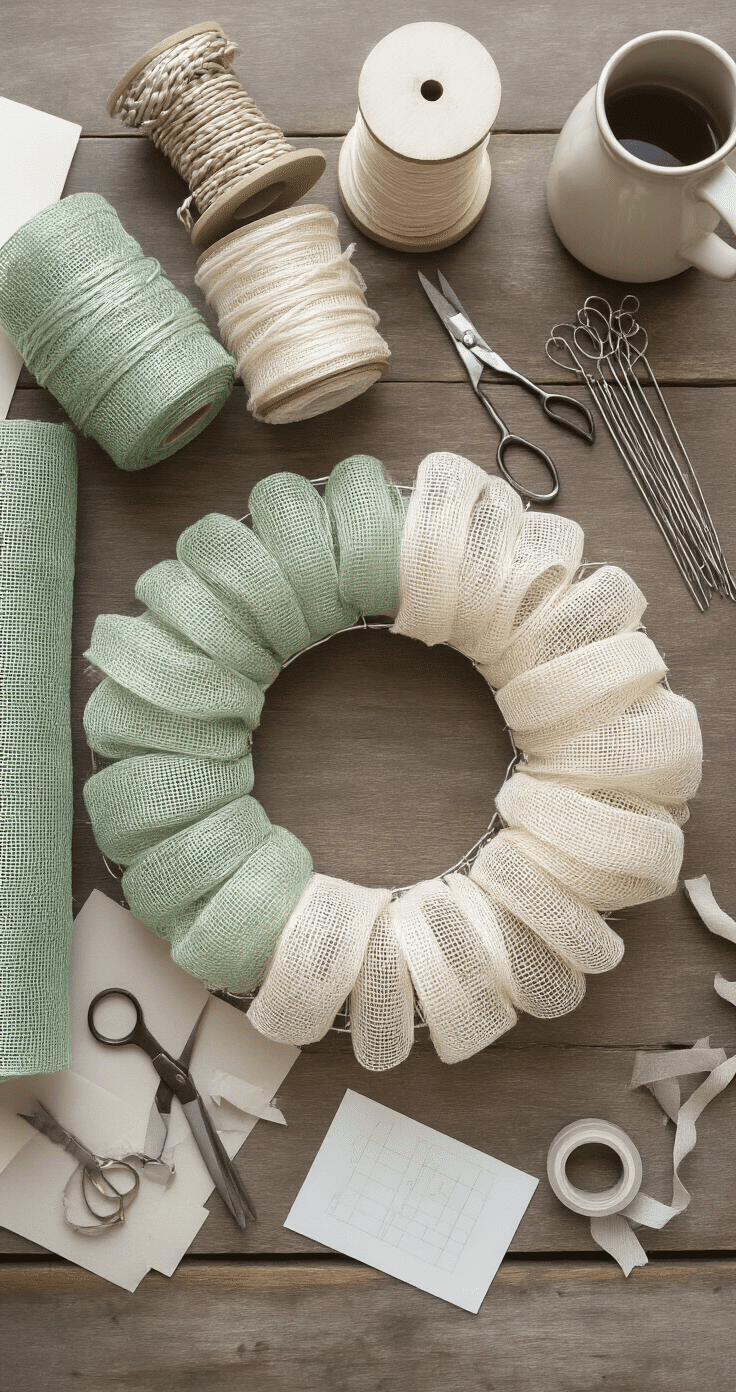
Cut your mesh into 6-inch wide strips (most deco mesh comes in 10-inch width, so you’re basically cutting it down the middle lengthwise).
Create “bubbles” or “puffs” by pushing about 6 inches of mesh between two pipe cleaners on the inner ring.
Scrunch it up a bit—you want it puffy, not stretched tight.
Move to the next set of pipe cleaners and repeat.
Keep going around the entire inner ring until it’s completely covered.
Then do the exact same thing on the outer ring.
The mesh should overlap slightly in the middle but not so much that you’re creating a bulky mess.
My first wreath had so much mesh in the base layer that I could barely add anything else to it.
You want coverage, not a mesh mountain.
Stand back and look at your wreath from a few feet away.
Does it look evenly puffy all around, or are there sad flat spots?
Fix those now before moving forward.
The Magic of Mesh Curls (This Is Where It Gets Fun)
This is the technique that transformed my wreaths from “nice try” to “wait, you actually made that?”
You’re going to create tight little mesh rosettes that add dimension and hide any mistakes in your base layer.
Making the curls efficiently:
Cut your remaining deco mesh into 10-inch squares.
Here’s the shortcut that changed my life: wrap your mesh around a 10×10 inch piece of cardboard about 15-20 times, then cut along both edges with scissors.
Boom—you just made 30-40 squares in about two minutes.
I need roughly 30-35 mesh squares per wreath (remember that pipe cleaner count?), so this template method is absolutely worth the setup time.
To form each curl:
Take one square and pinch it in the center.
Roll it tightly from one corner, keeping that center pinch as your anchor point.
It should look like a little fabric rosebud.
The tighter you roll it, the more defined and pretty it looks.
Loose rolls just look sloppy—I learned this after making an entire wreath with lazy rolls and hating how it turned out.
Set your curls aside in a pile (or a bowl, if you have cats who
This post may contain affiliate links. Please see my disclosure policy for details.


